River table epoxy calculator
Measure only the river — the gap between the two slabs, not the whole table — to get the epoxy to buy, the pour layers and kits.
Enter your measurements
More options: waste · proud · product …
- In short
- Buy 2 × 3 gal deep-pour kits. Pour the river in one layer, mixed in two batches.
- What the resin will weigh in the table (for the form and legs)
- 35.8 lb (16.2 kg)
- Left over from the last kit
- 1.71 gal (6.86 qt · 6.49 L)
Mixing details: batches, Part A and Part B
| Part A (resin) | Part B (hardener) | |
|---|---|---|
| Each batch (2 in all) | 5.71 qt · 13.7 lb | 2.86 qt · 5.78 lb |
| Whole job | 2.86 gal · 27.4 lb | 1.43 gal · 11.6 lb |
72 in × 8 in × (1-1/2 in + 1/16 in proud) = 900 cu in = 3.9 gal
+ 10% waste = 4.29 gal → 2 × 3 gal kits
Lifts: 1-9/16 in ÷ 2 in per layer → 1 lift
Batches: 4.29 gal ÷ 3 gal (one whole kit) → 2 → A 5.71 qt (13.7 lb) + B 2.86 qt (5.78 lb) each
Mix ratio 2 : 1 by volume, SG A 1.15 / B 0.97 (typical, not published by the maker — type your data sheet’s SGs for exact weights) → Part A 2.86 gal (27.4 lb) + Part B 1.43 gal (11.6 lb)
- What to buy: 2 × 3 gal deep-pour epoxy kits. Each kit has both bottles (resin + hardener) — you don’t buy them separately.
- Check the label’s minimum depth too. Many deep-pour resins list a minimum pour as well as a maximum — MAS Deep Pour X, for one, wants at least 2 in, and thinner pours cure slowly or stay soft. At 1-9/16 in, choose a resin whose range includes that depth, and type its minimum under Min depth per pour (More options) to check.
- Mix 2 batches of about 2.14 gal and pour them back to back into the same layer, before they start to thicken. Some labels also cap the mass per pour — check yours.
- Seal the live edges and any bark with a thin coat first — dry wood soaks up epoxy and releases bubbles into the pour.
- About 1.71 gal will be left in the jugs. Kept sealed, it fills knots and cracks later, or makes a practice river board.
Quick answers for common sizes
| Example | Answer |
|---|---|
| How much epoxy for a river coffee table | 2.14 gal |
| How much epoxy for a 5 ft river table | 3.57 gal |
| How much epoxy for a 6 ft river table | 4.29 gal |
| How much epoxy for an 8 ft river table | 9.43 gal |
| How much epoxy for a river charcuterie board | 0.29 gal |
| How much epoxy for a 180 cm river table | 16.4 L |
| How much epoxy for a 200 cm river table | 28.3 L |
Epoxy by table length (your river width and depth)
| River length | Deep-pour epoxy to buy | Kits to buy |
|---|---|---|
| 36 in | 2.14 gal | 1 kit |
| 48 in | 2.86 gal | 1 kit |
| 60 in | 3.57 gal | 2 kits |
| 72 in | 4.29 gal | 2 kits |
| 84 in | 5 gal | 2 kits |
| 96 in | 5.71 gal | 2 kits |
Set the slabs in the form (the sealed box or mold you pour into) where they’ll sit, then measure the gap in a few spots. Not built yet? Enter the width you’re planning. New to all this? Here are the epoxy words explained in plain English.
How the river table formula works
The channel is treated as a box: length × average width × pour depth. The pour depth is your slab thickness plus the little extra you pour proud of the wood — 1/16 in (1.5 mm) unless you change it — so the whole top can be sanded flat afterward. Anything that fills along with the river, like open knots and cracks you enter under Extra for knots, cracks and bark pockets, goes on top. That gives the net volume; the waste allowance covers resin left in the mixing buckets, small leaks through the form, and the thin seal coat you brush onto the live edges before the main pour.
average width = (w1 + w2 + … + wn) ÷ n
volume = length × average width × (depth + pour proud) + voids
US gallons = cubic inches ÷ 231
liters = cubic centimeters ÷ 1,000
lifts = pour depth ÷ deepest layer allowed, rounded up
Part A = total × A ÷ (A + B)
For example, a 72 in river averaging 8 in wide on 1.5 in slabs, poured 1/16 in proud, is 72 × 8 × 1 9/16 = 900 cubic inches. Divide by 231 and you get 3.9 gallons; add 10% and you should plan on about 4.29 gallons of mixed epoxy — two 3-gallon kits, with about 1.71 gallons left over. Poured flush with the wood it would be 864 cubic inches and 4.11 gallons, so the flattening allowance costs about 0.18 gallons on a table this size. That exact table is worked through, with other widths and an epoxy top coat, in How much epoxy for a 6 ft river table.
Measuring a live-edge river
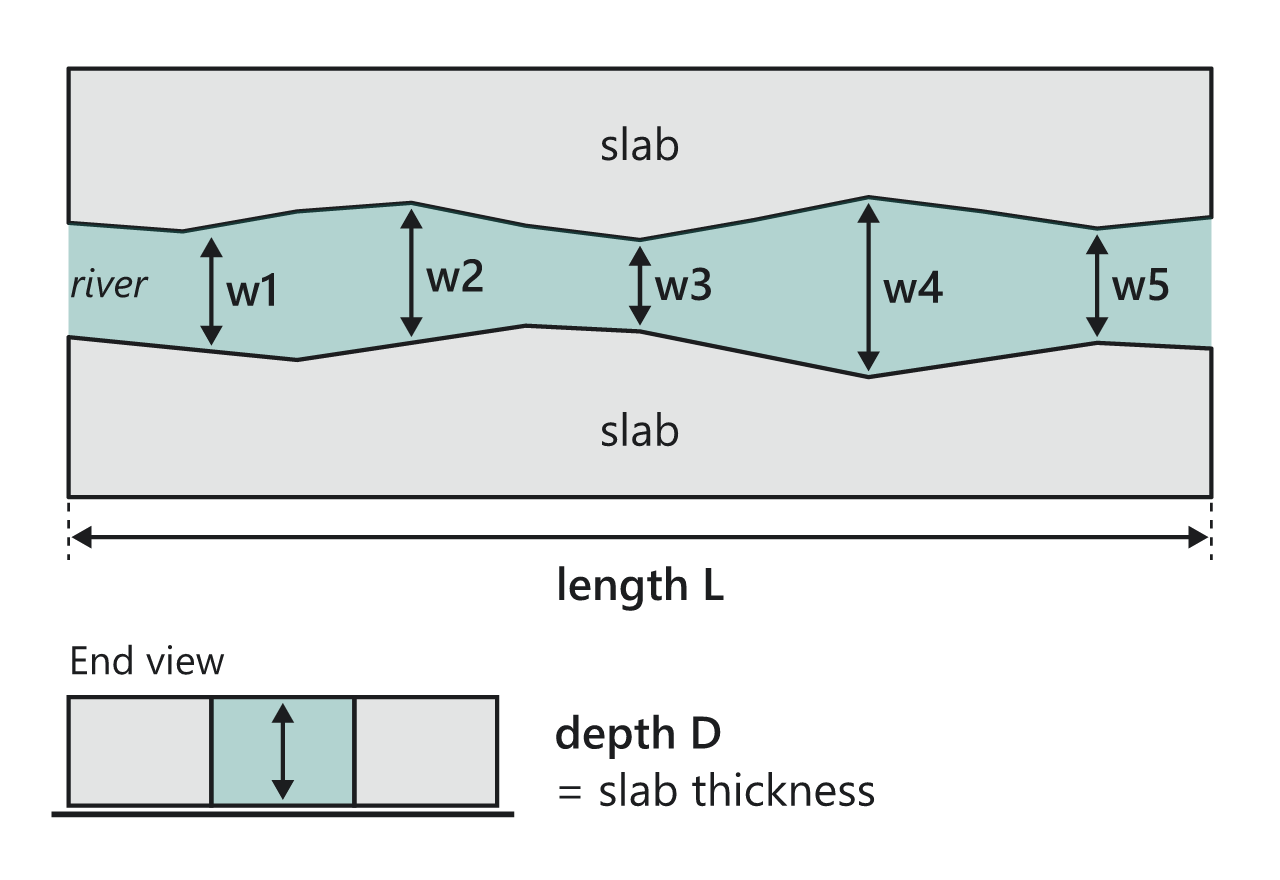
Live edges wander, so a single width measurement across the middle is usually wrong. Set the slabs in the form exactly where they will sit, switch How did you measure the width? to several spots, and measure the gap at evenly spaced points — every 12 in (30 cm) or so. The calculator averages up to five readings. If one end flares out into a wide “lake”, measure that section separately as its own river and add the results in your project list. A straight river, or one you are still planning, only needs the one average width.
Depth is the slab thickness at its thickest point, measured after the slabs are flattened. Don’t add anything for sanding yourself: the calculator adds the Pour proud amount, because the top gets flattened after the cure and epoxy shrinks slightly as it hardens. If you’ve already allowed for it in the depth, set Pour proud to 0. The diagram just below the calculator shows all three measurements.
Pours, heat and the depth limits
Deep-pour epoxies are formulated to cure slowly so the heat they release — the exotherm — can escape. Each product has a deepest layer it can take in one pour: commonly somewhere between 1 and 2 in, and more for some casting resins. MAS Epoxies, for example, rates its Deep Pour X for 2–3 in per pour and asks for materials and shop to stay between 60 and 80°F throughout. Enter your product’s figure in Deepest layer your epoxy allows and the calculator tells you how many lifts (separate layers) to plan, how deep each one is and how much to mix for it. Pour a thicker layer than the label allows and the resin can overheat, crack, yellow or fill with bubbles; WEST SYSTEM’s advice for any large cavity is the same — fill it in several layers, not one thick one. The count uses the full pour depth, so on 2 in slabs with a 2 in resin the 1/16 in poured proud is what tips it into two lifts; the note says so, and suggests the alternative.
Labels can set two more limits, and both live under More options. Min depth per pour: a slow resin needs enough mass to warm itself up — MAS lists 2 in for Deep Pour X, EcoPoxy 1/2 in for FlowCast — so the calculator warns when the pour, or each lift, would be thinner than that, and suggests how to split it. Leave it blank and the calculator still reminds you to check the label whenever a layer is under 2 in (5 cm), because that is where many deep-pour minimums sit. …but when one pour is over / …max depth is: some makers lower the depth, or cap the volume, for big pours. EcoPoxy lists FlowCast at 1/2–1 1/2 in per layer for pours up to 30 liters. The calculator adds lifts until every pour is inside both limits and says which one set the count. As a check, an 8 ft river averaging 12 in wide on 1.5 in slabs, poured flush, takes 8.23 gallons (31.1 L) with waste — just over FlowCast’s 30 L, so it becomes two lifts even though the depth alone fits in one.
Picking a product under Epoxy product fills in its mix ratio, part weights and depth limits from the maker’s published figures and hides those fields, so the two can’t disagree. Only MAS Deep Pour X and EcoPoxy FlowCast are listed, because those are the figures we have checked on the makers’ own pages; for anything else, type in the numbers from your label. Either way, the data sheet in your box wins.
Room temperature matters in both directions. A hot shop makes any pour behave like a deeper one, and a cold one slows everything down: Epoxyworks’ rule of thumb is that cure time roughly doubles for every 18°F (10°C) drop. Type the label’s Hours between lifts and Hours before you can demold and the calculator lays out a pour schedule — with 24 hours between lifts and 72 hours to demold, a two-lift table is about 4 days in the form. Those are label-temperature figures; the cure time calculator adjusts them for your own shop.
Mixing: batches, Part A and Part B by weight
Leave Largest batch you’ll mix blank and the calculator plans one whole kit per bucket. Enter a smaller size — 1.5 gal (6 L) is easy to handle with a drill paddle — and it splits each lift into equal batches, each shown as Part A and Part B by volume and by weight in the folded Mixing details table under the result. Mixed 1.5 gallons at a time, the 6 ft example becomes three batches of about 1.43 gallons, each 3.81 qt (9.14 lb) of Part A plus 1.9 qt (3.85 lb) of Part B. Pour them back to back into the same layer, before they start to thicken, and scrape the bucket sides and bottom every time.
For the weights, the calculator uses each part’s specific gravity — how heavy it is compared with water, shown as SG on the data sheet. Resin is usually heavier than hardener, so 2:1 by volume is not 2:1 by weight. Leave the SG fields blank for typical values (1.15 for Part A, 0.97 for Part B on a 2:1 product — typical, not published by any maker) or type in your data sheet’s figures; if your label gives the ratio by weight (100:44, say), pick that and the volumes are worked out from it. If you are new to this, you can ignore it: measuring by volume in marked buckets works fine, and the mixing table only tells you how much of each bottle goes in.
Kits, and the top coat
Deep-pour kits are usually sold as Part A + Part B combined — 1.5, 3 and 6 gallon sizes are common for 2:1 products, and EcoPoxy sells FlowCast in 6, 12, 30 and 60 liter kits — but some are named by the resin alone. Pick your size in Size of the kit you’re buying, or choose Another size and type it in — and if you pick MAS Deep Pour X or EcoPoxy FlowCast under Epoxy product, the list switches to the sizes that product is actually sold in (FlowCast in US units shows its liter kits as gallons); a metric kit sold by weight is roughly its kilograms ÷ 1.1 in liters. The calculator rounds up to whole kits, shows the leftover, and flags a tight fit when the last kit would be nearly empty — running short mid-pour is far worse than a spare jug.
If you’ll finish the table with a glossy epoxy coat rather than oil or wax, switch on the top-coat option and enter the overall table width. It is a different, thin-coat product (tabletop epoxy), so it is shown separately, with its own kit count in the buy line, and worked out exactly like the tabletop calculator: 1/8 in (3 mm) over the whole top, plus the drips and the film on all four edges (as tall as the slab is thick), plus 5% for the bucket.
Worked examples by table size
Each of these runs the numbers for one common build and covers what tends to go wrong at that size:
- How much epoxy for a river coffee table — 48 in long, a 6 in river, 1.5 in deep; why thin pours cure slowly.
- How much epoxy for a 5 ft river table — desk or four-seater; the kit arithmetic when you are just over 3 gallons.
- How much epoxy for a 6 ft river table — the standard six-seater and how much each inch of width adds.
- How much epoxy for a 7 ft river table — thicker slabs, mixing in batches, heat in a bigger mass.
- How much epoxy for an 8 ft river table — 2 in slabs, one lift or two, and cold-garage cure times.
- How much epoxy for a river charcuterie board — a practice piece measured in fluid ounces.
- How much epoxy for a 180 cm river table and How much epoxy for a 200 cm river table — metric builds in liters, with lifts and weight.
Tips for an accurate estimate
- Measure the width at five points if you can — one wide spot skews everything.
- Buy a little more than the calculator says. Running short mid-pour is far worse than having a quart left over.
- Weight matters for the form: the 6 ft example puts about 36 lb of liquid resin against the tape and caulk. The weight row shows yours.
- Knots, cracks and bark inclusions soak up extra resin. Enter a rough volume for the open ones, and bump the waste allowance to 15% for very open or punky wood.
- Seal-coat bare wood before the main pour. MAS recommends doing it with a faster epoxy rather than the slow deep-pour resin itself.
What you’ll need
- Deep pour epoxy kitPremium price
Low-viscosity, slow-curing resin made for thick pours. Check the label’s depth range before you buy — many have a minimum depth per pour (often about 2 in) as well as a maximum.
See options on Amazon (opens in a new tab) - Graduated mixing bucketsBudget price
Marked buckets make accurate Part A / Part B ratios easy — mismeasured ratios are a leading cause of soft, sticky cures.
See options on Amazon (opens in a new tab) - Drill paddle mixerBudget price
For batches of a gallon or more. Run it slowly — a fast paddle whips air into the resin.
See options on Amazon (opens in a new tab) - Epoxy mold release tapeBudget price
Lines the form so cured resin pops free. Cheaper than re-sanding a form stuck to your table.
See options on Amazon (opens in a new tab) - Heat gun or small torchMid-range price
A quick pass over the fresh pour pops surface bubbles. Keep it moving — lingering scorches the resin.
See options on Amazon (opens in a new tab)
As an Amazon Associate we earn from qualifying purchases. Links to products are affiliate links — they cost you nothing extra and help keep these calculators free.
Frequently asked questions
How much epoxy do I need for a 6 ft river table?
About 4.29 gallons for a 72 in river averaging 8 in wide on 1.5 in slabs, poured 1/16 in proud for flattening, including a 10% allowance — two 3-gallon kits. Other widths, thicker slabs and an epoxy top coat are worked through in How much epoxy for a 6 ft river table.
How many cubic inches are in a gallon of epoxy?
One US gallon is 231 cubic inches (3.785 liters). Divide the channel volume in cubic inches by 231 to get gallons.
Can I pour a 2 inch river table in one pour?
Only with an epoxy rated for a little more than 2 in, because you also pour about 1/16 in proud of the wood. Many deep-pour products allow 1–2 in per pour, some more. Pouring deeper than the label allows can overheat, crack, or yellow the resin — split it into lifts instead. How much epoxy for an 8 ft river table shows the pour count for different label ratings.
Why does the river table calculator add 1/16 in to my depth?
Because you pour slightly proud of the wood and sand the whole top flat once it cures; epoxy also shrinks a little as it hardens. It is the Pour proud setting under More options — 1/16 in (1.5 mm) by default. Set it to 0 if you already added the extra to your depth.
How do I measure a river that changes width?
Switch the width setting to several spots, measure the gap at evenly spaced points and enter them — the calculator averages up to five readings. If one section is much wider (a “lake”), calculate it separately and add it on.
How much Part A and Part B by weight does a river table take?
For the 6 ft example with a 2:1 epoxy, about 2.86 gallons (27.4 lb) of Part A and 1.43 gallons (11.6 lb) of Part B, using typical specific gravities of 1.15 and 0.97. Type your data sheet’s SG figures, or pick your product, for exact weights.
How much does the epoxy in a river table weigh?
Cured epoxy is typically around 1.1 g/ml, which works out to a little over 9 lb per gallon. The 6 ft example above adds roughly 36 lb of resin to the table, before the wood. Only the resin that ends up in the channel counts — the waste allowance stays in the buckets — which is why How much epoxy for a 200 cm river table buys 28.3 liters but puts 25.8 liters in the table.
Does the calculator include the epoxy top coat?
Only if you turn it on — and it’s shown separately, because a top coat uses tabletop epoxy rather than deep pour. The tabletop epoxy calculator handles seal coats and multiple coats in more detail.
Related guides
- Epoxy words explained: a plain-English glossary for first-timers
- How to calculate epoxy: the volume formula, with examples
- How long does epoxy take to dry and fully cure?
- How to make an epoxy river table: a step-by-step guide
- Deep pour vs tabletop epoxy: which one does your project need?
- Epoxy vs polyurethane for a table top: which finish to use
- Is epoxy food safe? What “food safe” really means for resin
- How to avoid bubbles in epoxy (and get rid of them)
Sources
- MAS Epoxies — Deep Pour X product page (opens in a new tab) — 2:1 mix; poured 2–3 in thick per pour (2 in minimum — thinner pours cure slowly); about 12 h working time and a 36 h cure; 1.5, 3 and 6 gallon kits; keep materials and shop at 60–80°F; seal-coat bare wood first. No specific gravities or weight ratio listed.
- EcoPoxy — FlowCast product page (opens in a new tab) — 2:1 by volume, 2.3:1 by mass; 13–38 mm (0.5–1.5 in) per layer for pours up to 30 L; pour the next layer while the last is tacky; demold after 3 days; 6, 12, 30 and 60 L kits.
- EcoPoxy — FlowCast technical data sheet (PDF, June 2022) (opens in a new tab) — Specific gravity Part A 1.122, Part B 0.978 at 22°C; tacky-to-touch (next-layer window) 20–44 h and demold 3 days for a 72 × 8 × 1.5 in casting at 21°C.
- Epoxyworks (WEST SYSTEM) — The Basics of WEST SYSTEM Epoxy Resin and Hardener (opens in a new tab) — How temperature and mass change cure speed; liquid, gel and solid stages.
- Epoxyworks — Cold Weather Bonding (opens in a new tab) — Cure time roughly doubles for every 18°F (10°C) drop in temperature.
- WEST SYSTEM — Uncontrolled Cure (opens in a new tab) — Heat build-up in a mixed mass; fill large cavities in several layers rather than one thick one.